Filed under: Uncategorized | Tags: bicycle, bike, broken, chain, cold, commute, commuting, rain, repair, snow, weather, winter
The weather forecast was predicting snow sometime today, and I have to admit that I was a bit intimidated at the thought of possibly having to ride in snow for the first time. Little did I know that I was going to have two different kinds of “firsts” today.
I voted before work this morning, so I got started on my commute about an hour later than usual, and by then the sky was darkening and the winds were shifting. When I finally hit the road the temperature was about 45 (F) and dropping quickly. I had a strong headwind for the first mile or so. I passed another biker on the other side of the road heading in the opposite direction. We waved at each other, two obvious members of the brotherhood of the slightly crazy bike commuters. The headwind got stronger, and then the rain started. That was the first of the “firsts”.
I know that some of you have to ride in the rain a lot, but until today I had only ridden in a couple of light showers that really didn’t even count. However, this morning certainly made up for things! About two miles into my five mile commute things started to get pretty exciting. The rain got heavy, and the headwinds started mixing with crosswind gusts so strong that they actually blew me around the road, and I had to be careful to not get blown over. I had my cold weather gear on, so I was warm, and my windbreaker is fairly waterproof, so my top half was dry… but I only had shorts and thermals on my lower half, so by the time I got to work my legs were pretty soaked.
In spite of all of this craziness I have to admit that there was a bit of fun and adventure to be had. Somewhere inside I sensed that little bit of rebellion that you get when you are a kid and you just keep playing as the rain pours down, and you think to yourself “Ha, I really shouldn’t be out here… but I am!” The other thing that kept my mind busy was watching the looks of the faces of the drivers I encountered, and wondering what they were thinking as the crazy guy in the bright yellow windbreaker came pedaling by on this blustery day.
The other “first” happened on the way home. Thankfully the weather had cleared a good bit, and although it did actually snow for about an hour mid-day, the roads were clear and the sun even showed up. It was in the low 40s, so I bundled up and set out for home a bit early to take advantage of the break in the weather. I had to wait for a stop light at the two mile mark, and when the light turned green and I started to pedal something popped while I was right in the middle of the intersection. I looked down and thought my chain had just derailed, but to my surprise the chain was actually broken and dragging on the street! I had never broken a chain before.
I quickly hopped off, ran the bike through the intersection, and found a grassy spot in front of the corner 7-11 to assess the damages. I was riding the Trek that I rebuilt, and I did replace the chain as part of the rebuild, but I don’t think the link that broke was the one the I fastened. Anyway, I was glad that I had my Crank Brothers multi-tool with the chain breaker tool, and I was glad for the rebuild experience since that was when I learned how to fasten a link. After a few minutes I had the chain fixed and was able to resume my commute.
A big wet storm… a broken chain…wow… what a crazy day!
Filed under: Uncategorized | Tags: 830, antelope, bicycle, bike, commuting, maintenance, Mountain Bike, parts, rebuild, recycle, repair, trek, winter
I finally got that old Trek Antelope 830 rebuilt and have ridden it on a couple of commutes!
If you read my previous post about the used Trek 830 I picked up from the classifieds, then you know that I got a lot more (or less) than I bargained for. I was looking for a used mountain bike that was still solid enough that I could clean it up a bit and use it for my winter bike commuting. I thought I had found a great deal when I located the Trek for $65, and my buyer’s excitement got the best of me. When I got home that excitement quickly went away as I realized that most of the major drivetrain components were beat up and worn beyond repair. Well, some more $$ later, with a good bit of learning and elbow grease thrown in, and I actually do have a usable commuting bike.
I’ve put almost 30 miles on it, and so far I am happy with the results. One of the first things that I like, but that has taken a lot of getting used to, is the more horizontal riding position due to the lower handlebars. Riding this bike is much more like riding a road bike, which is something I was used to in college, but I’m definitely not used to anymore. Although it felt awkward at first, I have come to enjoy the more aggressive feeling that comes from leaning forward while riding. The bike also feels much faster than I expected. I ended up changing out the entire crankset, instead of just the front chainrings, and the replacement set is not quite as big as the ones that were on there. I figured this would slow things down quite a bit, but it actually ends up being a very workable mix of gears, good for both speed and hills.
All in all, this has been a good experience, especially now that I am able to enjoy the fruits of my labor. At this point the only thing I’m still considering adding is a set of studded tires to deal with the snow and ice that is part of a Utah winter. I’m not sure about that, but it definitely sounds like it would lead to a more solid ride. I’ll keep you posted.
BTW, Thanks to all of you that voted in the poll from my last post that asked the question about wearing headphones while riding. The results were very interesting and surprising! I’ve got some ideas for some more polls, so stay tuned.
UPDATE: The Trek 830 has become my main ride, and I’ve put a lot of miles on it. Look here to read about the Trek 830’s snow adventure. I even updated it with clipless pedals, and you can read about that here.
Filed under: Uncategorized | Tags: 830, antelope, bicycle, bike, commuter, commuting, old, project, rebuild, repair, trek, used, webco, winter
I really didn’t go looking for another project. Really. I went looking for a “beater” mountain bike that I could turn into my winter commuter bike. I found one.
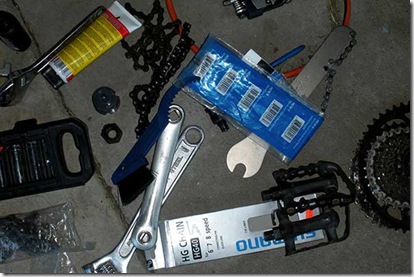
Yes, those are bike guts all over the floor. Will the patient live? A better question might be… “Should we admit the patient is really, really dead and move on with our lives?” Allow me to bring you up to speed…
For a few months I’ve been on the lookout for a couple of bikes. I would like to get something a bit more “serious” for my daily good weather commuting, and I would like to get a mountain bike that I can outfit for winter commuting. Winter is almost upon us here in Utah, and it won’t be long before the roads are snowy and icy, so a winter commuting bike is becoming an urgency if I’m going to keep riding. Last Saturday I thought I found what I was looking for… a used Trek Antelope 830 for $65. I called the seller, immediately drove over to take a look, took the bike for a 30 second ride up the block, had a pleasant 10 minute conversation about how he fixes up bikes and resells them, paid for the bike, and drove home with a big victory smile on my face. I then picked up a rack and a fender from a local bike shop (LBS), figured out how I was going to adjust things to get them installed, and then smiled proudly once again as I set eyes upon my new prize. I decided that I should probably lube the chain since it looked a bit tired… and that was when the fun really began. Here’s a picture of my new prize:
No, this picture is not upside down… the bike is upside down. That is the current state of its existence while I perform major surgery. When I started to lube the chain I noticed that it seemed to weave back and forth as I moved the pedals. Oh wow! The front chainrings were bent! (When I was a kid we called the things the chain went on “sprockets”… but somewhere in the last 30 years they have become “chainrings”… so in the interest of biker correctness I will henceforth use chainrings to refer to the poky metal circles that drive the chain.) Upon closer inspection, I saw that both the front and back chainrings were hammered! (Yes, I now also know that the rear chainrings are called a “cassette”, but we’ll get to that in a bit…) Teeth were worn and bent, and the chain itself was worn and had stretched so that it was not making proper contact. In my buyer’s exuberance over the “deal” that I had found, I had neglected to take a good look at the drivetrain components, and now I realized I had a tired old bike that needed some major surgery before it was going to be of much use to me.
Well, at this point I had to make a decision. I guess I could have tried to take it back to the seller, but he was a nice fellow and I really don’t think he was maliciously trying to sell me a bad bike, so I didn’t feel like it was his fault. I could have given the bike away, but that would mean that I just completely wasted my $65, and I still wouldn’t have a winter commuter. So I decided to go for door number three, which meant that I was going to learn to rebuild this thing and make it work. Oh, what a journey that has been over the last few days…!
When I was a kid (in the 1970’s… yeah, I guess I’m actually that old now) I used to work on my bikes all the time. I had a couple of bikes back then. I had a JCPenney special that I had completely stripped down and repainted black so that it looked cool, and I rode that like it was a BMX bike until I cracked the frame and rims trying to jump things that I had no business jumping. Then I saved up my lawn mowing money all summer and I got a “real” BMX bike, (for those that might remember… Webco frame, Webco chromoly forks, Astabula cranks, Oakley grips… oh yeah it was sweet) and I rode that thing every day for a few years. Those bikes were easy to work on, and I had no fear, so I did all the maintenance on them.
Fast forward to today. Now we have things called chainrings, cassettes, sealed bearings, bottom brackets, drivetrains, rapidfire shifters, downtubes, clipless pedals, and the list goes on. What used to be simple now sometimes seems so complex.
In spite of all of this “new” stuff, I decided to go for it with the repairs, and I dove headfirst into learning what I needed to know to get this done. I started reading everything that Google could find about bike repair, and watching lots of videos on YouTube and other places. (BicycleTutor.com is definitely your best friend) In the last few days I feel like I have learned more about modern bikes and bike repair than I thought was possible. I learned that this model of the Trek Antelope 830 was originally sold in 1992, and was only a mediocre bike back then. I now know that my Trek originally came with funky chainrings that Shimano introduced that are actually elliptical, not round, as a way to try to get more power on the entire stroke circle as you pedal, and these chainrings are not readily available today. I now know the difference between a freewheel and a cassette, and yes, the Trek has a cassette. I now know how to remove all of the drivetrain components on my Trek, and have actually done so. I now know the local bike shop owner on a first name basis, and he definitely knows me. I now also know that I did not save any money by buying that used Trek, in fact I’m not going to tell you how much I have spent at this point on parts and tools. (You can ask my wife, because she gets this nice smile on her face now whenever I come home from my latest trip to the bike shop. “But honey, the tools don’t count because they are an investment for the future.” At least that makes me feel a bit better when I say it.)
So… did I really blow it with this purchase? Well, I’m going to be positive and look beyond the financial part, and say that I think the experience I’m getting, and even the fun that I’m having (yes, I think I’m actually enjoying this) has made this whole thing worth it.
The bike is not ready yet. (Prepare for bike technical jargon) At this point I am in need of new chainrings that will fit the existing crank arms. I bought a complete crankset, but it will not work because the bottom bracket spindle on this old bike is longer than modern ones, so the front chainrings would be out of alignment. I’ve decided I’m going to use the existing crank arms and just get new chainrings. I’ve determined I need 5 arm 110/74 BCD front chainrings, and am currently deciding where I’ll get them. I replaced the cassette, and have a new chain waiting in the wings. I think I can get away without replacing any of the shifter or brake linkage, and I think my derailleurs are salvageable. I went ahead and bought a new saddle also, because I figured I was already in it this deep, so why not have a comfortable butt.
So that’s the lowdown on my latest project. I’m still choosing to be optimistic at this point, and I’m looking forward to riding this thing once I get it done. I’ll keep you posted as the adventure continues.
UPDATE: This story has a happy ending… take a look here.
Filed under: Uncategorized | Tags: Bike Commuting, Costco, extender, fixing, flat, HowTo, inner tube, maintenance, Midtown, pressure, psi, pump, repair, schrader, Schwinn, tires, tube, valve, valve stem
If you’ve read my previous posts, then you probably realize that when I started commuting with my Schwinn Midtown I had some problems with flats on the rear tire. Based on recent comments from readers, it seems that many of you out there also have had flats on your Midtown, and you have struggled to repair those flats so that you can get back to your riding. With that in mind, I figured I would discuss some more of the things I’ve learned as I’ve worked on my Midtown, and what I’ve done to deal with my tire issues.
The Basics
I’m not going to go into the details of actually fixing a flat tire because there are plenty of other places that will do a much better job of teaching you than I ever could. I would recommend that you check with your local bike shops and see if any of them offer a free bike maintenance clinic. I attended such a clinic at my local REI store, and it was a great help. You can also find plenty of great videos on YouTube that will give you some good advice.
When you are dealing with a flat tire, one of the first things you need to do is to figure out what caused the flat. Did you run over some kind of road hazard, like glass, or a thorn, or a piece of sharp metal? Did you have your tire pressure too low and hit a bump, like a curb, so that the inner tube got pinched against the rim, which caused a “pinch flat”? Or is your tire just flat and you have no idea what caused it?
In my case, the rear flats were not caused by a road hazard, and did not seem to be pinch flats, which are usually on the sides of the tube. In both cases the leak in my tubes was on the inside edge of the tube, where the tube is against the rim, a few inches from the valve stem. I am still not sure what caused those leaks, but I think it might have been similar to a pinch flat, but caused by the tube going against the spoke holes in the rim ,which was enough to rub a hole in the tube.
One of the next things to think about when dealing with flat tires is whether you can repair the inner tube, or if you need to replace the old tube with a new one. In my case, I tried to repair the tube twice, but the hole was in a spot where the rubber had a bump in it, and I also used the new press-on patches, instead of the old glue-on kind. As soon as I put the tire back on and pumped it up, I heard the sound of air leaking and realized my patch wasn’t holding. Argh!
My Solutions
So here is what I did to remedy my problems…
1) I replaced the rear tube with a heavy duty tube with Slime in it. I have read mixed reviews of Slime, and it seems like people either like it or hate it. I was pretty desperate to find a solution, so I tried it, and I have not had issues. I don’t know if it is the Slime, or the heavy duty tube, but I haven’t even had to add air to the tire at all since I replaced it a couple of weeks ago. If you don’t like Slime, then there are plenty of other tubes out there. Just be sure you get a 26 inch tube that’s about 2 inches in diameter and has a Schrader valve. The tires on the Midtown are 26×2.00 so a 26×1.75-2.25 Schrader valve tube will work just fine.
2) I made sure that all of the spoke holes on the rim were nice and smooth. There is a rubber strip, like a big rubber band, that goes around the rim, and sits between the metal rim and the inner tube. It is there to cover up the holes and protect the tube. I removed that strip, and then checked each of the spoke holes and cleaned them up with a file to make sure they were nice and smooth, then replaced the strip, and put everything back together. That took a bit of work, and I’m not sure if it made a difference, but as I said, I was desperate. Reader Jon Grinder, an experienced bike mechanic, also recommend replacing the rubber rim strip with rim tape which is thicker and tends to stay in place better than the rubber strip. I have not done this yet, but it sounds like a good idea, and I’ll probably do so at some point.
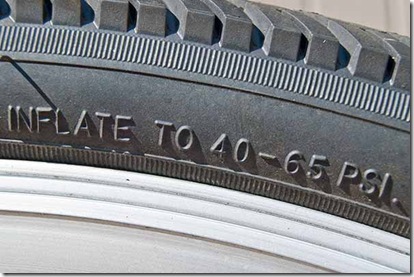
3) I make sure that my tires are at the proper pressure every single time I ride. The recommend pressure for the tires on the Midtown is 40-65 PSI. I actually fill my rear tire a bit more than that to make up for the extra weight that I have over the rear tire when I carry stuff on the rack. Do this at your own risk, since you are exceeding the rated pressure once you pass 65 PSI. The other important part of keeping the tires at the right pressure is to have a good pump with an accurate pressure gauge. I have an air compressor and it was easy and fast to fill my tires with it, but I found that I was having a hard time keeping the pressure consistent. I went to REI and got a Serfas floor pump and it was a great investment. Now I hook the pump up and check the pressure before I ride, topping the tires off if needed. It only takes an extra minute or two, and the peace of mind is worth it.
Extra Long Valve Stem
If you replace the original tubes on the Midtown, you will quickly realize that the stock tubes have an extra long valve stem. The picture on the left is the stock Midtown tube, and the picture on the right is a normal tube.
When you install the standard tube in the Midtown rim you will notice that the valve stem just barely sticks out of the hole in the rim. Again, the picture on top is the stock tube, and the picture on the bottom is a replacement tube.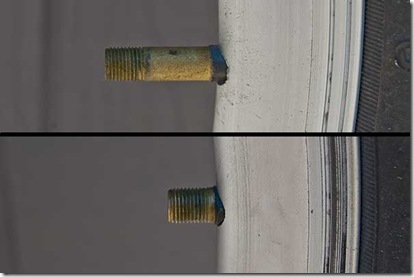
Getting the shorter valve stem to go all the way through the rim is a bit of a challenge, and the best way I found to make it work was to pinch the SIDES of the tube and tire, which helps push the valve through the hole. My first instinct was to push directly behind the valve stem, but this was difficult, and didn’t accomplish much. Instead, squeezing the sides of the tube seems to extend the valve stem farther into the hole. Once you get the valve stem through the hole then you can put the cap on to hold it in place while you finish installing the tire, or better yet, put a valve extender on the valve stem.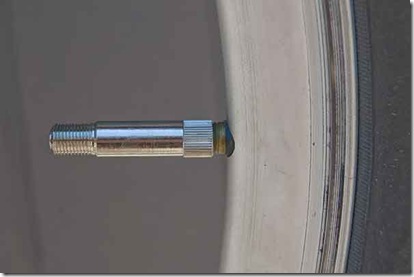
Getting the pump to grab on to the short valve stem can be a challenge, especially when the tube is completely empty, so I picked up a set of valve stem extenders from a local auto parts store, and now filling the tube is easy again.
I did look around a bit to try to find tubes with a long valve stem, and I haven’t been able to find them anywhere. At this point, I don’t really consider it to be a problem, because I’m confident I can make a regular tube work.
It has been at least two weeks, and probably 75 miles of riding, since I took the actions described above, and I haven’t had any more issues with flat tires on my Schwinn Midtown. Hopefully this information will help those of you that have experienced similar challenges, and get you back on the road again.
Filed under: Uncategorized | Tags: biking, commuting, flat tire, flats, inner tube, Midtown, patches, repair, Schwinn, tubes
I have experienced two flat tires within my last five rides. I hope that ratio doesn’t continue! The worst part is that the holes in the tube were in similar places both times… on the rim side of the tube! This means they weren’t caused by road hazards, they were caused by something on the rim. The first time I visually inspected the rim, and ran my fingers around the area, I couldn’t feel anything that would cause a flat. This time, I actually removed the rubber strip that covers the spoke holes, and inspected everything again, but I still didn’t see or feel anything obvious. I did take a file and smoothed over ever spot I could find that looked that least bit suspicious, so I hope that will make some kind of difference.
One of the frustrating parts was that when I put everything back together and pumped up the tire… I heard air leaking again… and realized that my patch was not holding. Argh! So I took everything apart again, and just replaced the tube completely. I now have two leaky tubes that need patching… but I don’t trust those “stick on” patches that I was using. I’m going to buy an old school glue on patch kit, and then I’ll fix those tubes, and keep one with me as a spare.
Both of these flats were on my rear wheel. I weigh around 200 lbs, and I carry a pannier that is loaded with about 15-20 lbs of gear, which means my rear wheel is carrying most of that weight. I’ve been very careful to make sure that my tires are at the correct pressure, and I’ve even tried to keep that rear one filled about 5 lbs over spec since I’ve noticed the rear tire seems to compress down a lot while I’m riding, especially up hills. I really don’t think these were pinch flats, because they both were a single distinct hole, and both on the rim side. If this keeps up I’m going to try one of those heavy duty tubes to see if that will make a difference.
Do any of you out there have any flat tire wisdom to share? Have flats been much of an issue with your rides? Do you carry an extra tube all the time? Have you had success with those “stick on” patches, or do you use the old school glue on kind? I’d love to hear your thoughts.
UPDATE: I think I fixed my tire issues. Go here to see the solutions I ended up with.
